Working From Home
This page contains information on how to access CS systems from outside the department. Please observe the conditions of use when making use of these services.
- Thinlinc provides access to CS managed Linux Desktops, and also enables access to UCL services.
- SSH is for Linux users who need access to CS file systems and Linux servers.
- CSopenVPN is our VPN for Mac, Windows and Linux users who need access to CS file systems, CS Desktops and UCL services.
- RDS provides access to Windows software and services.
- Remote GPUs are available via our Remote workstation service
- Accessing your CS H drive
- Accessing CS file stores
- UCL OneDrive migration
This is a guide on how to use the ThinLinc Client to get a remote desktop environment on Linux.
If you are using a managed machine, or a machine that we have set up for you, then the ThinLinc Client application should already be installed.
If the client application is not currently installed on your machine you can download it from the link below.
Download Client
Please select the appropriate client for your operating system:
Click here to download the ThinLinc Client
If you have a Mac with an Apple silicon processor, then you will need to install Rosetta 2 to use ThinLinc.
Quick Start
Launch the ThinLinc Client application and type csrw.cs.ucl.ac.uk in the Server field. Then, type your CS username and password in the corresponding fields.
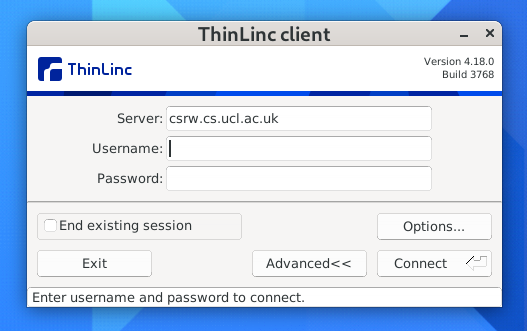
Then, click Connect to start your session.
Once connected, you will have a choice to connect to either a GNOME Desktop, or a GNOME Classic Desktop.
Configuration Options
In the login window there will be an options button (if this is not visible click the Advanced button). This will allow you to configure a variety of options before launching your remote session.
This includes:
Display Mode – ThinLinc by default starts your remote session in fullscreen mode. To exit full screen press F8. You can also set screen size by clicking on the Screen tab at the top of the options box. Then, select the screen size you would like the session to use.
Local Devices – You can configure your local devices, (e.g. drives and printers) before you start your remote session. If you click on the Local Devices tab you can select the tick box for the devices you wish to have access to during your session.
Ending Your ThinLinc Session
There are two methods of ending your remote session, Log Out or Disconnect.
Log Out will end the session on the server and log you off leaving no active session running. This is the recommended method. To logout of a remote session follow your normal logout procedure for a desktop environment.
Disconnect will leave the session running on the server but disconnect the connection on your machine. This option makes it possible to start a remote session on one machine, disconnect, then rejoin the same active session on another machine. The desktop environment will remain way you left it. For example you could connect to a remote session through ThinLinc in the office, disconnect, go home, launch ThinLinc and connect to the same session that you were using in the office.
However, each disconnected session retains one of a limited number of licences. If all licences are in use then no new sessions can begin, which may prevent some users from being able to connect. As such, please be considerate to other users.
To disconnect a session use the pop up session menu (press F8) and click Disconnect Session.
Warnings
- It is important to regularly save work when using remote sessions.
- Idle sessions will be automatically terminated after 24 hours and any unsaved work will be lost.
- In the event of a system failure the session will terminate and any unsaved work or active processes will be lost.
- Servers are regularly rebooted (the first Wednesday of every month) for maintenance and this terminates any disconnected sessions.
- In very rare cases it will be necessary for us to shut-down servers without notice, this will terminate any disconnected sessions running on the server and any unsaved work will be lost.
Many CS services are not accessible from outside of CS networks. To access them, first log into one of our ssh gateway nodes:
tails.cs.ucl.ac.uk for staff members
knuckles.cs.ucl.ac.uk for students
then ssh from there to whichever machine you need to connect to.
You can do this in one command:
ssh -l alice -J alice@tails.cs.ucl.ac.uk destination.cs.ucl.ac.uk
alice with your CS username and destination with the name of the machine you wish to connect to).openVPN is our VPN service for CS staff users. The aim of this service is to provide secure and private communication to CS network services from remote locations. It is not generally accessible to taught students. For taught students, please use Thinlinc or ssh to connect to the CS network from outside of UCL, and feel free to contact us if there are any issues.
When connected to openVPN you must abide by the UCL Computer Regulations and JANET Acceptable Use Policy.
It is important that your system is protected against security threats and the pages below offer further advice:
Before you can use openVPN you need to install the CS openVPN client. There are a few ways you can access the client:
From a CS network (WiFi or wired connection):
- \\evs2.cs.ucl.ac.uk\window-software\apps\openvpn
- https://support.cs.ucl.ac.uk
Or remotely (non-CS network):
- sftp/ssh to tails.cs.ucl.ac.uk and access the client from the folder /cs/docs/support/downloads/openvpn
Alternatively, email request@cs.ucl.ac.uk to arrange for TSG to install openVPN on your laptop.
This service is being phased out and you can use the new RDS Service (scroll down) instead.
RDS2016 is part of our remote worker service and provides remote access to Windows software. To access RDS2016 you can either use thinlinc or the Remote Desktop Connection app. Thinlinc will allow connectivity from anywhere whereas Remote Desktop Connection will only work from the CS network.
Setup Remote Desktop Connection to access RDS2016
You can only use the option when connected to the CS network or CSwall.
1. Open Remote Desktop Connection from the Start button, which is usually found under Windows Accesories

Or right-click the Start button, choose Run and enter mstsc

Enter rds2016.cs.ucl.ac.uk as the computer name. Before connection you can use Show Options to change the session screen resolution.

Select Display to change the session screen resolution.

After selection Connect login as CS\username

At the end of your session right click the Start button, choose Shut down or sign out and then sign out.

RDS provides remote access to Windows software and central CS and UCL services.
To access use your web browser to open https://rds.cs.ucl.ac.uk/RDWeb/webclient/index.html from the CS network or VPN.
We recommend that you store your critical and work related data on our file systems especially when working remotely.
We recommend that you store your CS-related data on your H drive when working remotely.
To access your H drive on our CS file systems you must be connected to the CS network or VPN.
1.Open Explorer from the Start button, and right-click This PC.
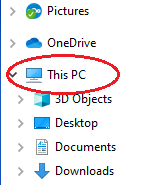
2. Select Map Network Drive.
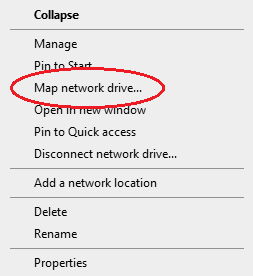
3. Select H from Drive and enter \\smbhelp.cs.ucl.ac.uk\username into Folder where username is your CS username (not your UCL one). Select Connect using different credentials and optionally Reconnect at sign-in.
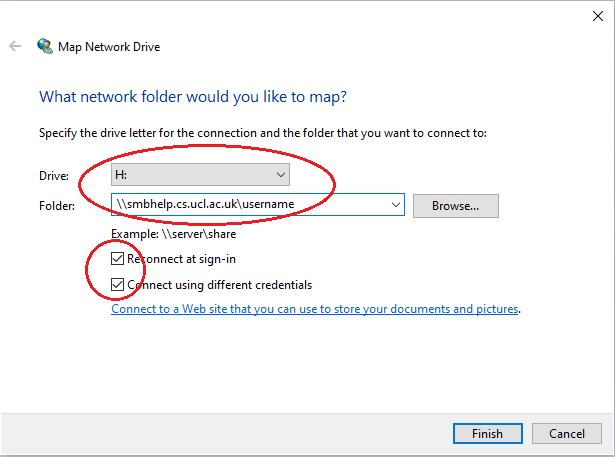
4. You must login with your CS username. To do this select More Choices.
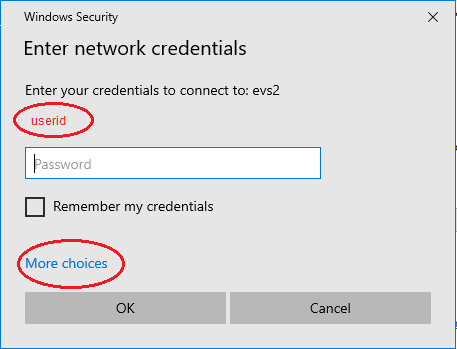
5. Select Use a different account.
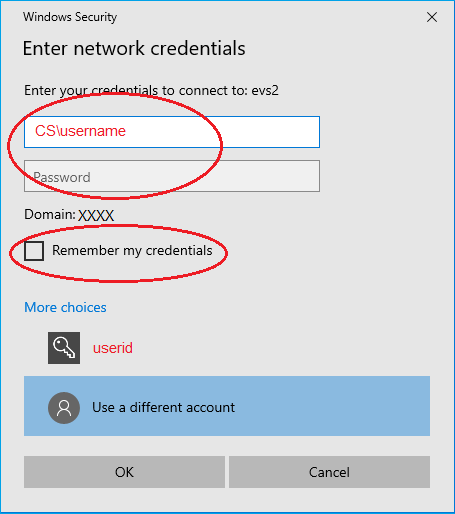
6. Enter your username in the format CS\username, for example CS\bertieb, and your password. Optionally select Remember my credentials.

Creating Shortcuts to Drive H
Creating shortcuts allows you to find your files and folders quickly.
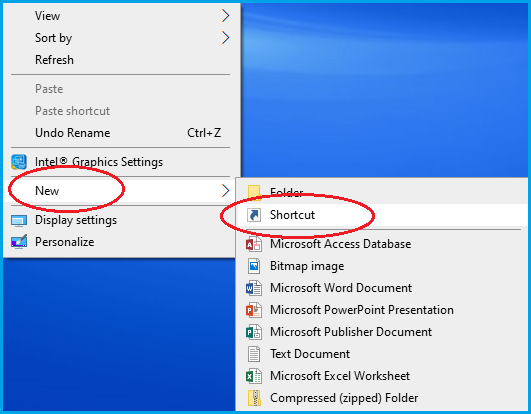
1. Right-click your desktop, select New and then Shortcut.
2. Select Browse.
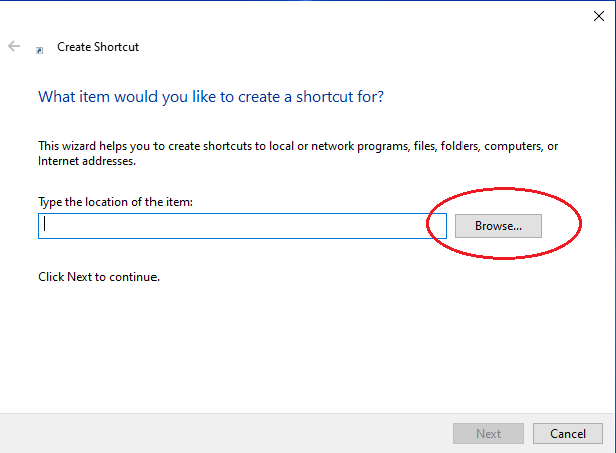
3. Choose Drive H.
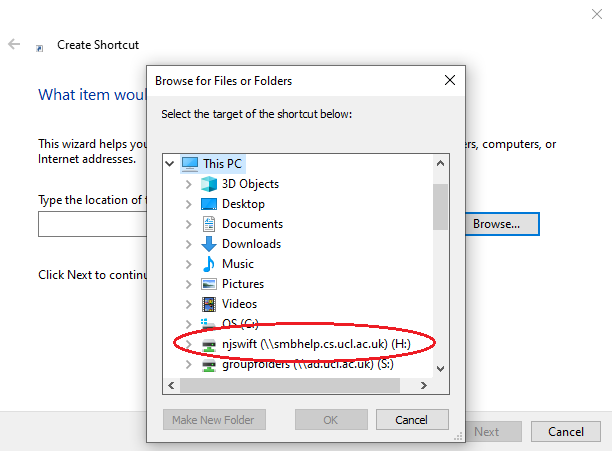
4. Select the relevant folder from drive H.
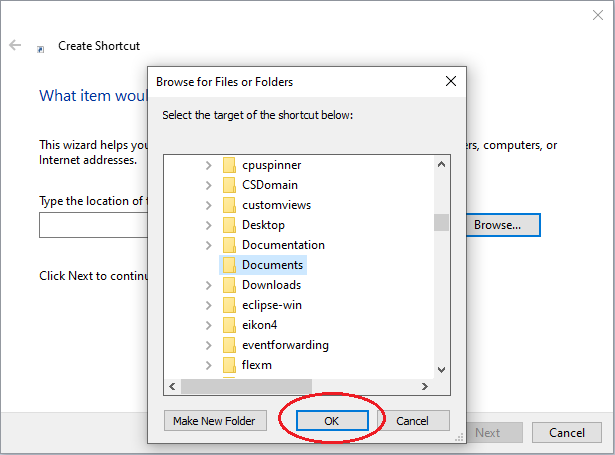
5. Select Next to confirm the folder.
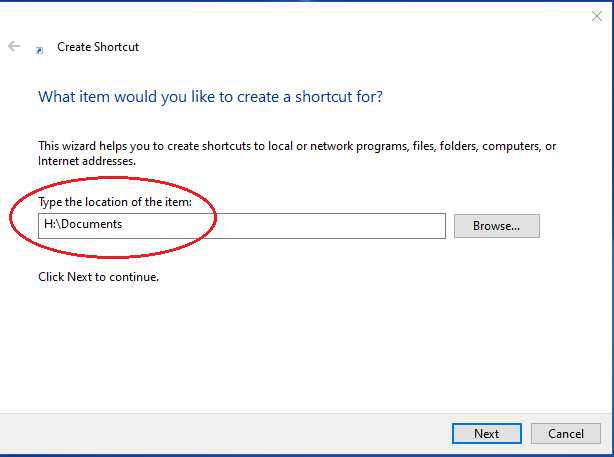
6. Enter a description for the shortcut.
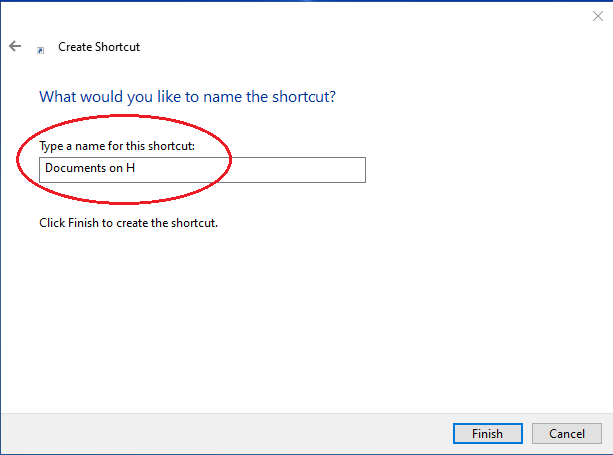
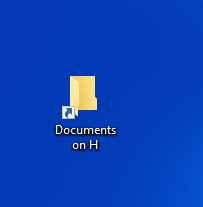
7. A shortcut is created on your desktop.
To access a remote GPU you can use our Remote Workstation service.
UCL is migrating to OneDrive. How much it will affect CS users will depend upon whether you previously stored data on UCLs N drive. The N drive was for your personal files. If you login to a manage UCL service such as Desktop@UCL you will no longer have an N drive but a “OneDrive – University College London” drive instead. All your N drive files will have been migrated to this your UCL OneDrive.
For remote users you won’t need to use either the UCL VPN or CS VPN to access UCL OneDrive files as you can access them directly from your remote PC/laptop.
For windows users if you have office 2016 or higher installed you should have one drive installed as well.
You will need to login to OneDrive with your UCL login (the one usually starting ucac) to access your UCL OneDrive files. There’s a FAQ which answers some common questions at FAQ.
You can also access your UCL OneDrive files via the web at Sign in – Microsoft OneDrive (live.com)
This migration doesn’t affect the UCL S drive which is for shared group folders.
This does not affect CS file stores which you will still access as you did before.
